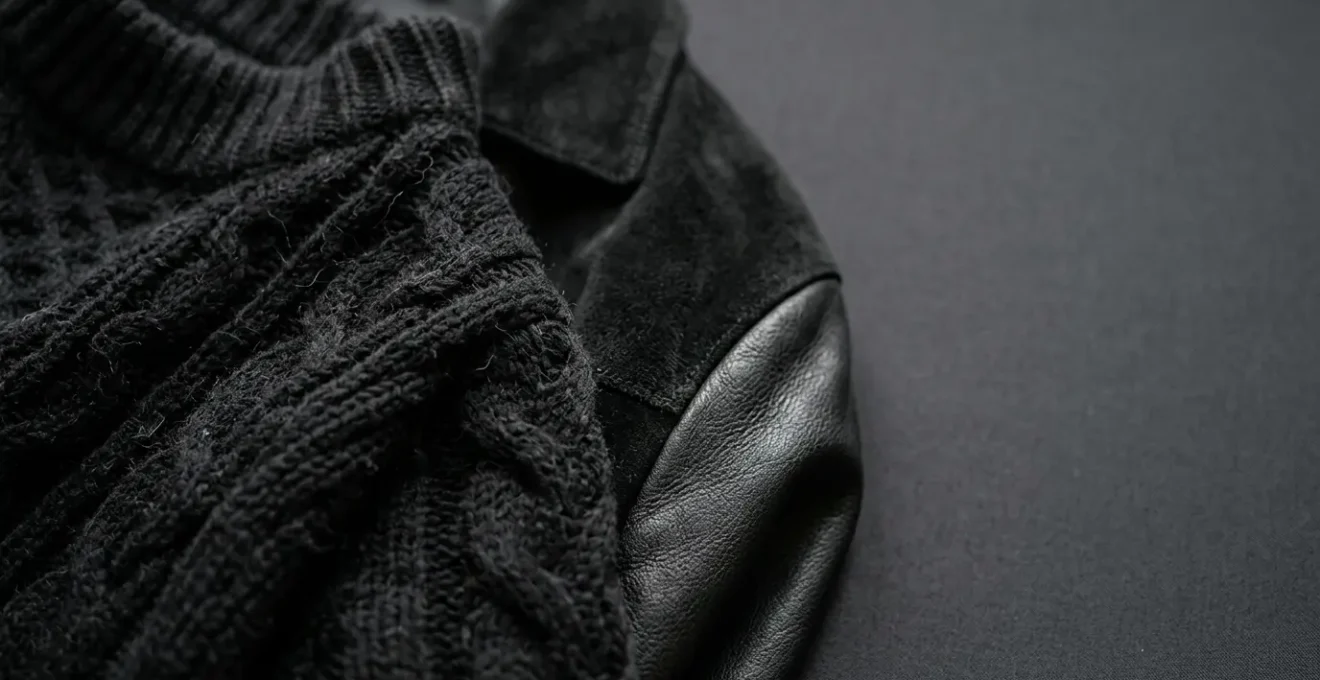
The key to an expensive-looking monochrome outfit isn’t the price tag, but the strategic control of how different textures interact with light.
- Soft knits and matte leathers like suede absorb light, creating deep, rich black tones that add visual weight.
- Glossy and grained leathers reflect light, producing highlights and shadows that sculpt the silhouette and add dimension.
Recommendation: Combine light-absorbing and light-reflecting materials in a single outfit to create a dynamic dialogue of textures, effectively eliminating the flatness of a single-note black look.
There’s an undeniable power to an all-black outfit. It’s chic, timeless, and universally flattering. Yet, there’s a fine line between an ensemble that looks effortlessly expensive and one that feels… flat. For lovers of black clothing, this is a common frustration: you’ve assembled quality pieces, but the final result lacks depth and appears one-dimensional, almost like a void. The usual advice revolves around adding a pop of color, a statement accessory, or focusing on a perfect fit. While valid, these tips miss the fundamental element that truly elevates a monochrome look: texture.
The secret weapon of a master stylist isn’t a magical color wheel; it’s a deep understanding of physics, specifically how different materials play with light. An outfit’s perceived value is born from the complex visual information it presents. A single, uniform black fabric offers the eye very little to interpret, hence the « flatness. » But when you introduce a dialogue between different materials, you create a rich tapestry of light and shadow. The true key to unlocking a luxurious look is not about adding more *things*, but about mastering the subtle interplay between the light-absorbing softness of knitwear and the light-reflecting character of leather.
This isn’t just about throwing a leather jacket over a sweater. It’s a deliberate art. This guide will deconstruct the principles of texture styling. We will explore how to choose the right type of leather to convey softness or structure, how to leverage details like perforations for visual interest, and even how to care for these materials to maintain their intended finish. By understanding the « why » behind the techniques, you’ll gain the skills to make every all-black outfit you wear look intentional, complex, and undeniably expensive.
To guide you through this textural exploration, we’ve broken down the essential concepts and techniques. This article covers everything from the foundational choice between suede and grain to the expert-level finessing of tucking a chunky sweater.
Summary: A Deep Dive into Texture and Light for Monochrome Styling
- Suede vs. Grain: Which Texture Adds More Softness to a Look?
- Perforated Leather: Is It Breathable Enough for Spring Days?
- The Freezer Trick: Does It Really Stretch Tight Leather Shoes?
- Python and Cowhide: Is Mixing Exotic Textures Too Much?
- Matte vs. Glossy: How to Bring the Shine Back to Dull Leggings?
- How to Remove a Pen Mark from Vintage Leather Without Ruining the Patina?
- Thermal or Cotton: What to Wear Under Wool to Stop Itching?
- How to Tuck a Chunky Sweater into Jeans Without a Bulge?
Suede vs. Grain: Which Texture Adds More Softness to a Look?
When building a textured black outfit, the choice between suede and grained leather is a foundational decision that dictates the entire mood. While both are forms of leather, they interact with light in opposite ways, directly impacting their perceived softness. Grained leather, with its natural surface, has subtle peaks and valleys that catch light, creating minimal highlights and defining its structure. It has a presence that feels solid and defined. Suede, on the other hand, is the champion of softness, and the reason lies in its unique surface.
Suede is created from the underside of the animal hide, which is then buffed to create a napped, velvety finish. This fuzzy texture does something remarkable with light: it traps and absorbs it. As styling experts have noted, suede absorbs light instead of reflecting it, creating an incredibly deep, non-reflective black that exudes an understated elegance. This lack of reflection is what our eyes interpret as softness and depth. It’s a quiet luxury, a texture that invites touch and adds a gentle, plush counterpoint to the sharper lines of other garments in an all-black look.
This distinction is crucial for strategic styling. If your goal is to soften the hard edge of a pair of black jeans or a structured coat, a suede jacket or boot is the superior choice. As the experts at Rustic Town Leather put it so well:
Suede, while equally fashionable, offers a softer, more nuanced appearance that exudes luxury and comfort.
– Rustic Town Leather Experts, Leather vs Suede: What’s the Difference?
Pairing suede with a chunky wool knit doubles down on this light-absorbing quality, creating an outfit of profound depth and coziness. Conversely, pairing suede with a satin or silk piece creates a powerful contrast between total light absorption and high reflection, a hallmark of an advanced, expensive-looking ensemble.
Perforated Leather: Is It Breathable Enough for Spring Days?
Perforated leather directly addresses a practical limitation of the material: its lack of breathability. By introducing a pattern of tiny holes, airflow is significantly increased, making it a viable and stylish option for transitional seasons like spring. But from a texture styling perspective, its function is secondary to its form. Perforations transform a flat leather surface into a dynamic field of visual interest, introducing a geometric element that is key to creating a sophisticated monochrome outfit.
Each tiny hole acts as a « micro-shadow, » creating a subtle, repeating pattern of light and dark across the garment’s surface. This texture breaks up the monotony of a solid black plane, adding a layer of complexity that feels modern and intentional. It’s a technique that has gained significant traction in high fashion, and according to Spring 2026 fashion trend analysis, perforated leather is a major feature on the runways, used in everything from jackets to trousers to accessories. This trend underscores its value not just for comfort, but for its powerful visual impact.
As you can see, the effect is more than just functional. The interplay of the smooth leather surface with the voids of the perforations creates a three-dimensional quality. This is precisely the kind of detail that elevates an all-black look. When pairing a perforated leather piece, consider keeping the other textures simpler. A fine-gauge merino wool sweater or a simple cotton tee allows the geometric pattern of the leather to become the focal point, creating a balanced and expensive-looking aesthetic without overwhelming the eye.
The Freezer Trick: Does It Really Stretch Tight Leather Shoes?
The infamous freezer trick for stretching tight leather shoes is one of those DIY hacks that feels almost too good to be true. The principle is based on simple physics: place a sealed bag of water inside the shoe and put it in the freezer. As the water freezes, it expands, gently stretching the leather. And the science is sound; footwear experts note that water expands by approximately 9% when frozen, providing significant, steady pressure from within. This can indeed provide that crucial extra millimeter of space in a pair of snug loafers or boots.
However, as a texture and material expert, it is my duty to issue a strong word of caution. This method is a blunt instrument, and not all leathers are created equal. Applying this trick without understanding the material can lead to irreversible damage, turning a potential wardrobe staple into a costly mistake. Treated leathers, especially those with a plastic or patent coating, can become brittle at low temperatures and are prone to cracking under pressure. Delicate materials like lambskin can be misshapen, and perhaps most critically, the moisture and condensation involved can compromise the glues used in the shoe’s construction, leading to sole separation down the line.
Before you even consider this method, especially for expensive or vintage footwear, it’s essential to assess the risks. The safest approach is always to take prized shoes to a professional cobbler who uses controlled stretching machines. If you do decide to proceed with a sturdy, unfinished leather, do so with caution.
- Safe for freezing: High-end unfinished leathers (like calf or napa) and sturdy cowhide can often withstand the process.
- Risky for freezing: Treated leathers with coatings are very likely to crack.
- Not recommended: Avoid this method entirely for delicate lambskin, patent leather, and exotic skins.
- Structural Warning: Be aware that moisture can weaken the adhesives holding the shoe together.
Python and Cowhide: Is Mixing Exotic Textures Too Much?
Mixing exotic leather textures, like the small, intricate scales of python with the larger, more rugged grain of cowhide, can feel like a high-stakes fashion gamble. The fear is that it will look chaotic, busy, or « too much. » However, when executed with principle and restraint, this advanced technique is a hallmark of a truly sophisticated and expensive-looking outfit. It’s about creating a controlled conversation between textures, not a shouting match.
The key to success lies in establishing a clear hierarchy. One texture must be the star, and the other must play a supporting role. For instance, a python-print handbag (the star) can be beautifully complemented by the subtle texture of a grained cowhide belt (the accent). This prevents the textures from competing for attention. Another critical principle is varying the textural scale. The small, repetitive pattern of python contrasts beautifully with the larger, more organic pattern of cowhide, creating a pleasing visual rhythm. This is a deliberate choice that demonstrates a high level of styling confidence. As the stylists at Cuadra note:
Mixing exotic grains is a bold move, but when done right (with quality finishes), it feels sharp, not loud.
– Cuadra Exotic Leather Stylists, How to Style Exotic Leather This Spring
To ensure the look remains sharp, pay close attention to the finish. Mixing two high-gloss exotic textures can quickly look cheap. The more sophisticated approach is to contrast sheens: pair a matte-finish python with a subtly glossy cowhide, or vice versa. This creates another layer of depth and shows an expert-level attention to detail. The rest of the outfit should remain simple—a black cashmere knit or a simple silk blouse provides a quiet backdrop that allows the exotic textures to shine.
Matte vs. Glossy: How to Bring the Shine Back to Dull Leggings?
The difference between a matte and a glossy finish is purely a story of light. A glossy surface is perfectly smooth, acting like a mirror to reflect light directly back at the viewer, creating sharp highlights. A matte surface is microscopically uneven, scattering light in all directions and resulting in a soft, non-reflective finish. When your once-glossy faux-leather or coated leggings start to look dull, it’s because their surface is no longer smooth. It has been compromised by microscopic scratches, abrasions, and a buildup of residue from detergents or the environment.
Restoring that expensive-looking shine is a two-step process focused on one goal: recreating a perfectly smooth, light-reflecting surface. You must first clean and then polish. Forget harsh cleaners; they will only create more damage. The first step is a gentle, deep cleaning. Use a soft microfiber cloth with a small amount of a pH-neutral cleaner or even just cool water with a drop of mild soap. Work in gentle, circular motions to lift away any film or residue that is scattering the light.
After the leggings are completely dry, the second step is to address the micro-scratches. This is where a specialized conditioner or polish comes in. For faux-leather or coated fabrics, look for a silicone-based vinyl or plastic protectant, often found in automotive care sections. Silicone is effective because it fills in the microscopic imperfections, creating a uniform, slick surface. Apply a very small amount to a clean, dry cloth and buff it into the material in long, even strokes. Let it cure for the time specified on the product instructions. The result will be a restored glossy finish that reflects light cleanly, bringing back the sharp, liquid look that makes the garment appear new and high-end.
How to Remove a Pen Mark from Vintage Leather Without Ruining the Patina?
Confronted with a pen mark on a piece of vintage leather, the first instinct is often to scrub it away. This is the single biggest mistake you can make. With vintage leather, the primary goal is not to restore it to a factory-new state, but to preserve its character. This character is embodied in its patina—the beautiful sheen, subtle color variations, and gentle wear marks that have developed over years of use. As the philosophy of vintage conservation holds:
The patina is not a flaw, but the ‘soul’ of vintage leather that tells a story and signals authenticity.
– Vintage Leather Conservation Philosophy, Spring Leather Jackets 2024: Timeless Style & Versatility
The patina is a delicate surface layer of oils, waxes, and history. Aggressive cleaning with harsh solvents or excessive rubbing will strip this layer away, leaving a noticeable, dull patch that is far more unsightly than the original pen mark. The correct approach is to start with the least aggressive method possible and proceed with extreme caution. Before trying anything, always test on a hidden area, like an inside seam or under a flap.
For a fresh ink stain on finished leather, a simple art gum eraser or a specialized leather eraser can sometimes lift the ink without abrading the surface. If that fails, the next step is a targeted application of isopropyl alcohol. Dip the very tip of a cotton swab in alcohol, dab off the excess so it is barely damp, and gently dab—do not rub—the ink mark. The goal is to let the alcohol dissolve the ink so it can be lifted off with a clean part of the swab. Work in tiny sections. In many cases, it’s better to accept a faint, faded mark as part of the item’s history than to risk creating a large, permanent blemish by trying to erase it completely.
Thermal or Cotton: What to Wear Under Wool to Stop Itching?
The dreaded itch of a wool sweater against the skin is a common dilemma, often leading people to grab the nearest cotton t-shirt as a barrier. While cotton can provide a buffer, it’s often a bulky and imperfect solution that can compromise the look of your expensive knitwear. From a styling perspective, the ideal under-layer doesn’t just prevent itching; it enhances the drape and silhouette of the wool sweater, and modern technical fabrics far outperform basic cotton in this regard.
Cotton tends to be thick and can cling, creating friction and causing the wool sweater to bunch up or hang awkwardly. To maintain that effortless, luxurious drape, you need an under-layer that is exceptionally smooth and lightweight. This is where materials like silk, Tencel, and Modal shine. These fabrics create a sleek, low-friction surface that allows the chunky knit to move and fall as the designer intended. They solve the itch problem while remaining virtually invisible, preserving the clean lines of the outfit.
Here are the superior alternatives to cotton for wearing under wool:
- Silk: The ultimate luxury choice. It offers unparalleled smoothness and breathability, creating a perfect, non-bulky barrier.
- Tencel/Modal: These sustainable, modern fabrics are known for their exceptional softness and fluid drape. They are highly effective at preventing itch without the bulk of cotton.
- Ultra-fine Merino Wool: It may seem counterintuitive, but a base layer of ultra-fine, high-quality merino wool is so soft it won’t itch, and it acts as a perfect buffer against a coarser wool sweater while maintaining excellent temperature regulation.
Upgrading your base layer from simple cotton is a small change that has a significant impact on both comfort and the overall polished appearance of your outfit. A smooth base layer is the invisible foundation that makes your expensive knitwear look its best.
Key Takeaways
- Light is Key: An outfit’s perceived value lies in contrasting light-absorbing textures (suede, wool) with light-reflecting ones (glossy leather) to create depth.
- Scale and Sheen: When mixing bold textures like exotics, vary the pattern scale and the surface sheen (matte vs. glossy) to create harmony, not chaos.
- Preserve, Don’t Erase: Treat the patina on vintage leather as a valuable feature that tells a story; always use the gentlest cleaning methods to preserve it.
How to Tuck a Chunky Sweater into Jeans Without a Bulge?
Tucking a chunky sweater into jeans is the secret to defining your waist and giving an otherwise shapeless knit a polished silhouette. However, the execution is everything. A clumsy tuck results in a lumpy, unflattering bulge around the midsection that completely defeats the purpose. The goal is to manage the fabric volume, creating the illusion of a clean tuck without the bulk. Professional stylists have developed several techniques to achieve this flawlessly, turning a potentially awkward look into one of deliberate, casual elegance.
The most crucial factor is avoiding an all-around tuck. Stuffing the entire hem of a thick sweater into your waistband is a guaranteed recipe for a bulky midriff. Instead, the focus should be on partial tucks and clever illusions that suggest a waistline. Pairing these techniques with the right rise of jean is also key; high-rise jeans are the most forgiving and work best for creating a defined waist with a chunky knit. By mastering a few simple methods, you can confidently wear your favorite cozy sweaters without sacrificing a sleek and sophisticated line.
Action Plan: Mastering the No-Bulge Sweater Tuck
- The One-Point Tuck: The simplest and most effective method. Tuck only a small, two-inch section of the sweater’s front hem into the center of your jeans, just beside the button. Let the sides drape loosely for a relaxed, « I-just-threw-this-on » elegance.
- The Full-Tuck Illusion: For a cleaner look, use a skinny belt over your jeans. Tuck the sweater’s hem up and under the belt all the way around, then gently blouse it out over the belt to hide it. This creates a clean, defined waistline without adding fabric inside your jeans.
- The Bra-Tuck Method: For a cropped effect without cutting your sweater, tuck the hem of the sweater up and into the bottom band of your bra. This creates a perfect blouson silhouette that hits at the natural waist, ideal for pairing with high-rise pants.
- The No-Tuck Belt Solution: The easiest way to define your waist without any tucking at all. Simply wear your sweater untucked and cinch it at the waist with a stylish belt on the outside. This works best with slightly longer sweaters.
- Choose Banded Hems: When shopping, look for sweaters that have a tighter, banded hem. These sweaters are designed to naturally create a blouson effect and sit neatly at the waist without requiring any tucking.
By using these targeted techniques, you are no longer just wearing a sweater; you are actively sculpting your silhouette. This intentional approach to styling is the very definition of an expensive-looking outfit.
Now that you are equipped with the principles of texture, light, and silhouette, you can approach your all-black wardrobe with a stylist’s eye. Start experimenting with these techniques today and transform your monochrome outfits from flat to fascinating.